Tulip free standing lace doily tutorial
In order to create the free standing lace doily you will need:
- Our free standing lace doily design: SKU 10656 Tulip free standing lace doily
- Water-soluble stabilizer suitable for free standing lace (we prefer the fabric-like Vilene DO104)
- Suitable machine embroidery thread: We find that polyester thread for sewing (not embroidery) machine is especially suitable for these designs as it looks like cotton but produces less fluff. In order to have the stitched out embroidery look the same on both sides, we would recommend that you use the same upper thread and bobbin thread.
Step-by-step instructions
-
- Hoop the water-soluble stabilizer. Depending on the type of stabilizer you are using, you have to hoop up to 4 layers. Make sure it is hooped very tight and stays that way during the stitching out. We would recommend that you use the smallest possible hoop. It is better to stitch out 1 design at a time. Trying to save time by stitching 2 or more designs in a single hoop may in fact result in delays, as you may have to re-stitch some designs due to stabilizer issues. You will need to stitch part 1 (the doily center) once while part 2 (doily side) has to be stitched 4 (four) times.

Stitch out the free standing lace
When you are done stitching – cut away the excess stabilizer
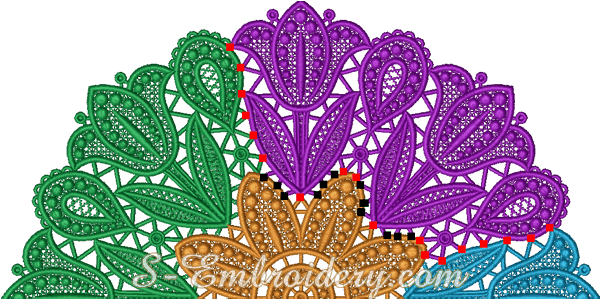
- Arrange the components and connect them to each other with manual stitches from the back side using the same thread you used to stitch out the designs. The places for the stitches are marked with red and black on the following image. We have marked with black the places where we have provided small loops in order to make connecting the pieces easier.
Note places for manual stitches
Connect components with manual stitches
Assembled FSL doily
- When you have finished connecting the pieces – place the free standing lace doily in water until the stabilizer is completely dissolved. Subject to the stabilizer used it may take up to 5 hours or more. We would recommend that you change the water in order to facilitate the process.
- Take the lace doily out of the water, place it on a towel and let it dry, then iron it. Your doily is ready!
If you like what you see – order the Tulip freestanding lace doily
- Hoop the water-soluble stabilizer. Depending on the type of stabilizer you are using, you have to hoop up to 4 layers. Make sure it is hooped very tight and stays that way during the stitching out. We would recommend that you use the smallest possible hoop. It is better to stitch out 1 design at a time. Trying to save time by stitching 2 or more designs in a single hoop may in fact result in delays, as you may have to re-stitch some designs due to stabilizer issues. You will need to stitch part 1 (the doily center) once while part 2 (doily side) has to be stitched 4 (four) times.